StackPath
StackPath’s CDN is highly customizable, including features like content protection and asset optimization. Once you’ve launched your site at Kinsta, if you would like to use StackPath’s CDN instead of Kinsta’s CDN, this guide shows you how.
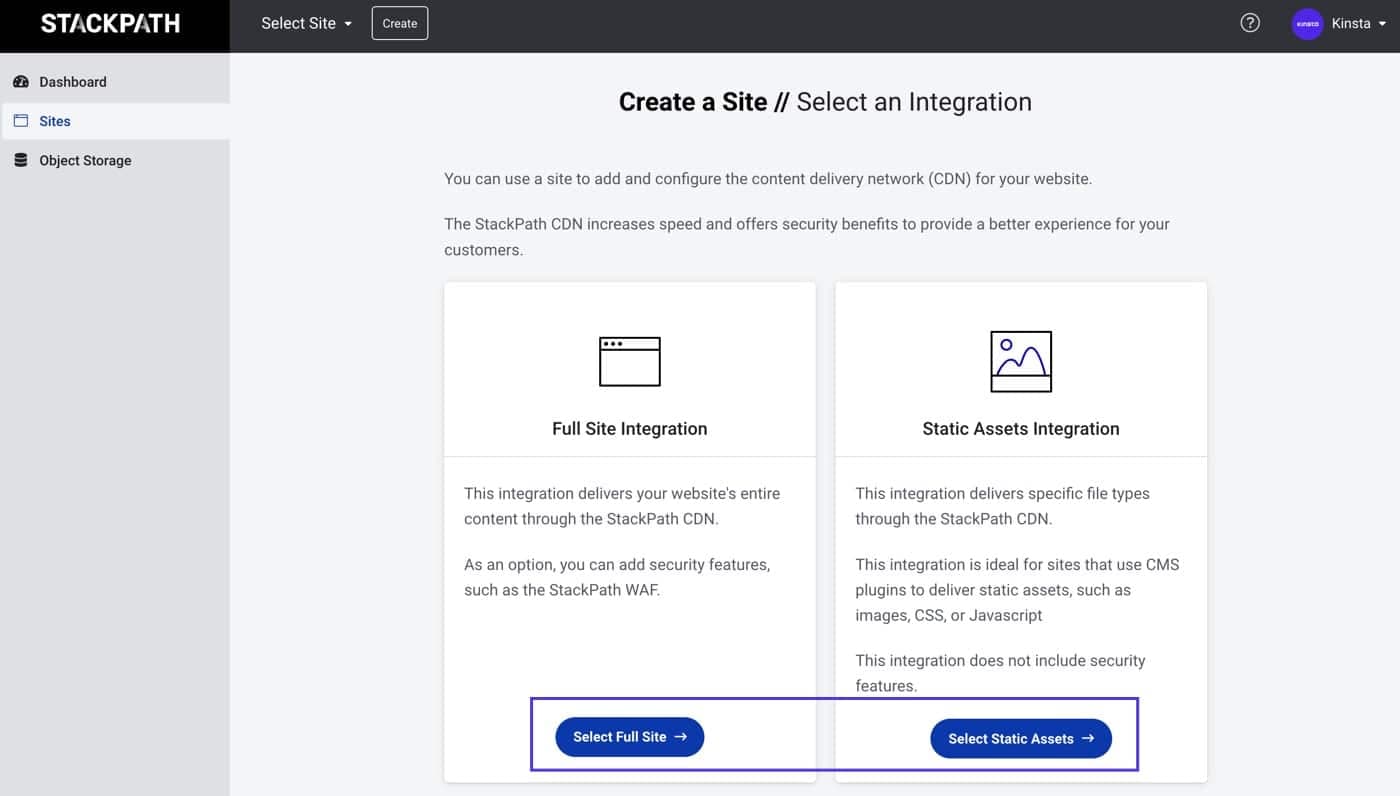
For WordPress, StackPath offers two different configurations, Full Site Integration and Static Assets Integration. Full Site Integration caches the entire site in the same domain, while Static Assets Integration uses a subdomain to cache only static content. These are both compatible with our Cloudflare integration.
You will need a subdomain to use the Static Assets Integration, but that subdomain doesn’t have to be added to your site’s Domains list in MyKinsta because we automatically add the wildcard subdomain (*.example.com) when you add your domain in MyKinsta. You’ll also need to use a plugin like CDN Enabler to rewrite the asset URLs from the StackPath edge address to your subdomain. We’ll cover that a bit more in the Static Assets Integration section below.
Other than needing a subdomain for the Static Assets Integration, settings and options at StackPath for both integrations are the same for compatibility with our Cloudflare integration. For Static Assets Integration, you’ll also need a plugin to alter the URLs of your static assets, which we’ll cover in the Static Assets Integration section below.
Get Started With StackPath CDN
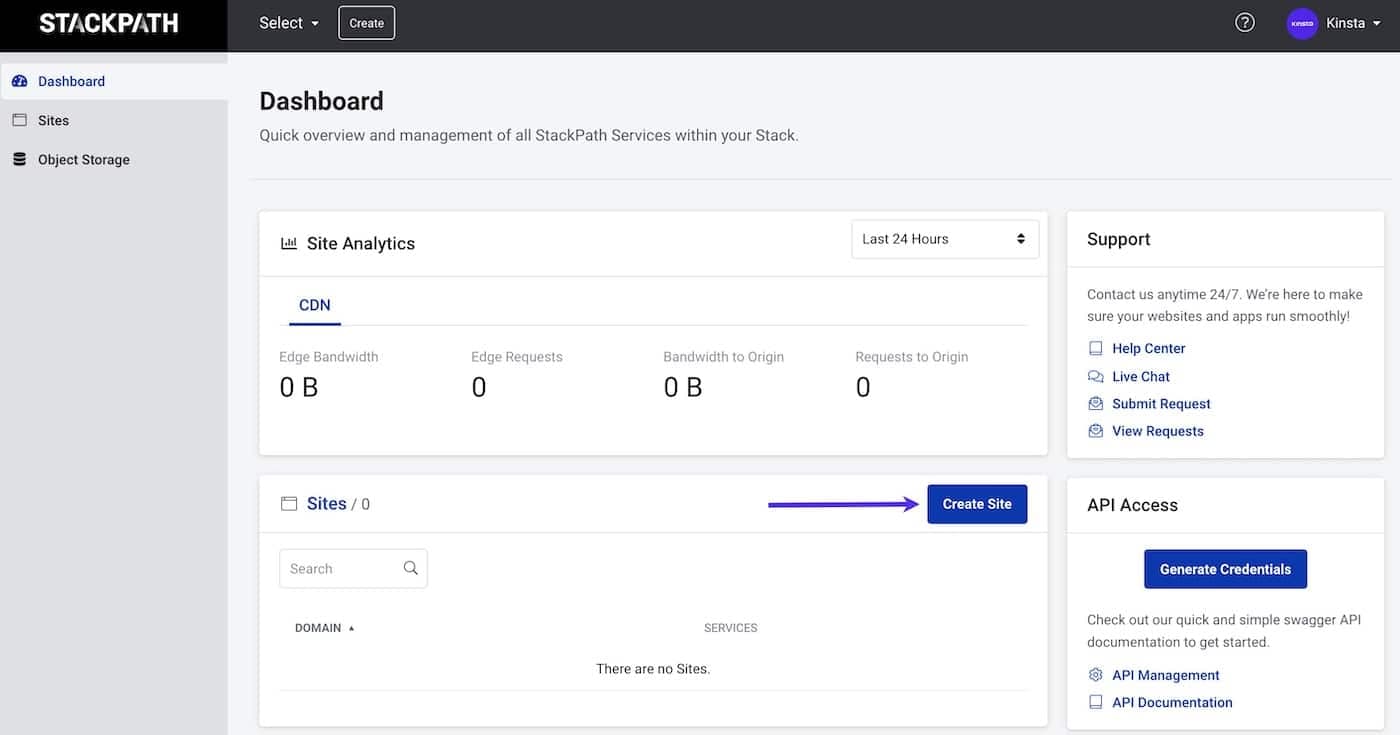
If you don’t already have a StackPath account, you can sign up on their registration page. Then, log in to your StackPath account and click the Create Site button in the Sites section.
On the Select an Integration page, click the button for the type of integration you want to set up, Full Site or Static Assets.
Full Site Integration
Step 1 – Set up Your Origin
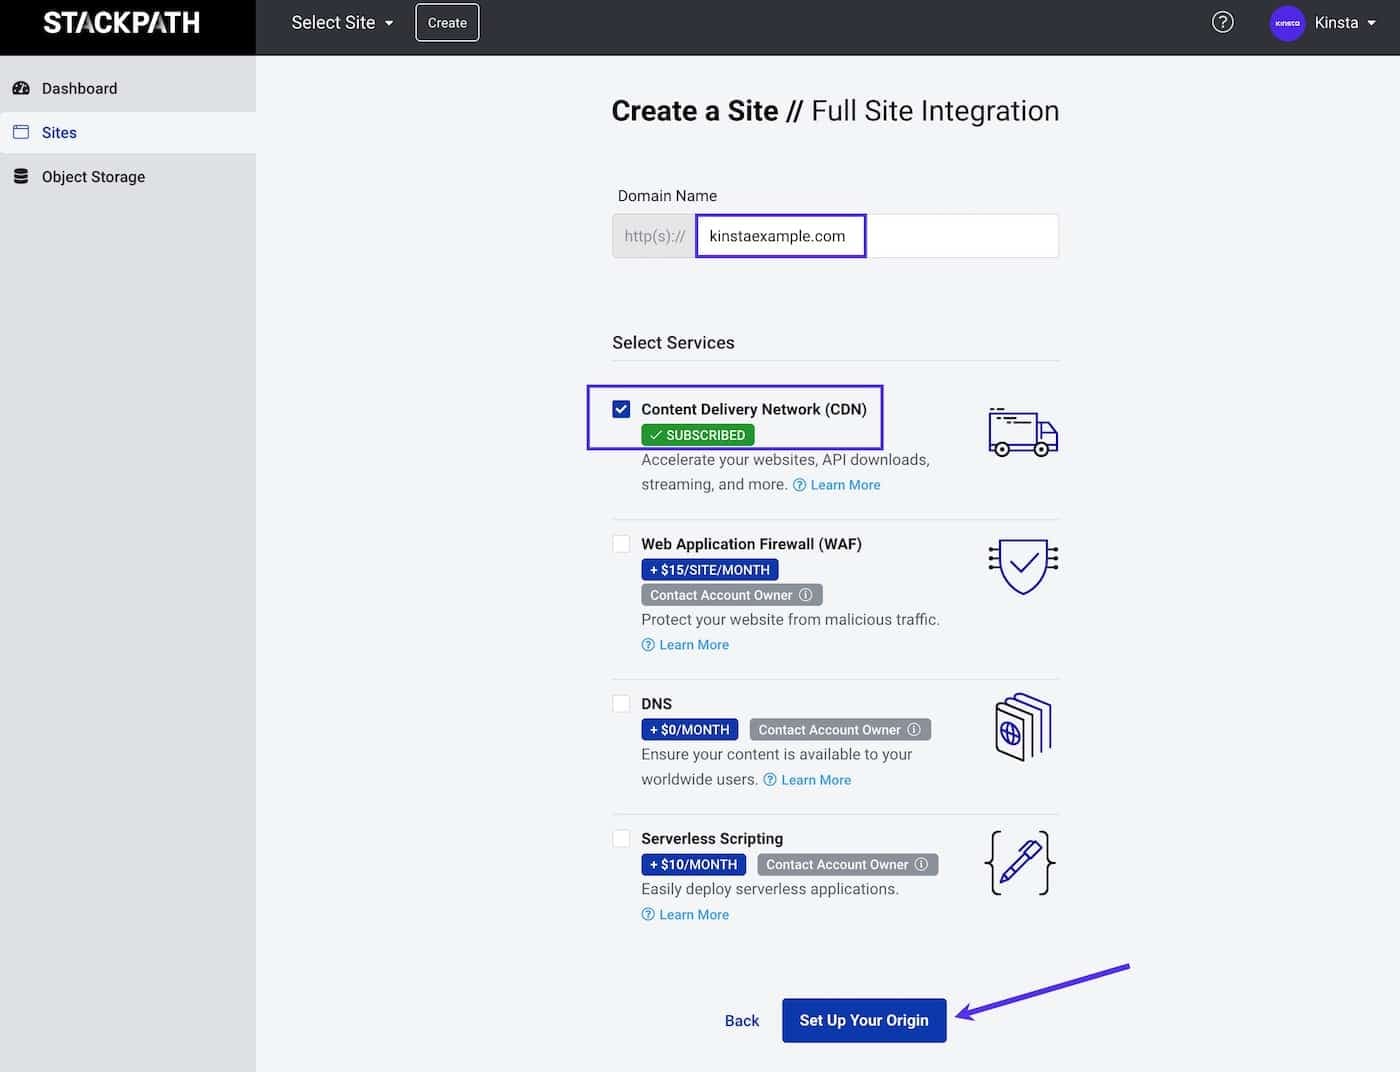
Once you’ve selected Full Site Integration and advanced to the next page, enter your domain name, select the services you want to use with your site, and click the Set Up Your Origin button.
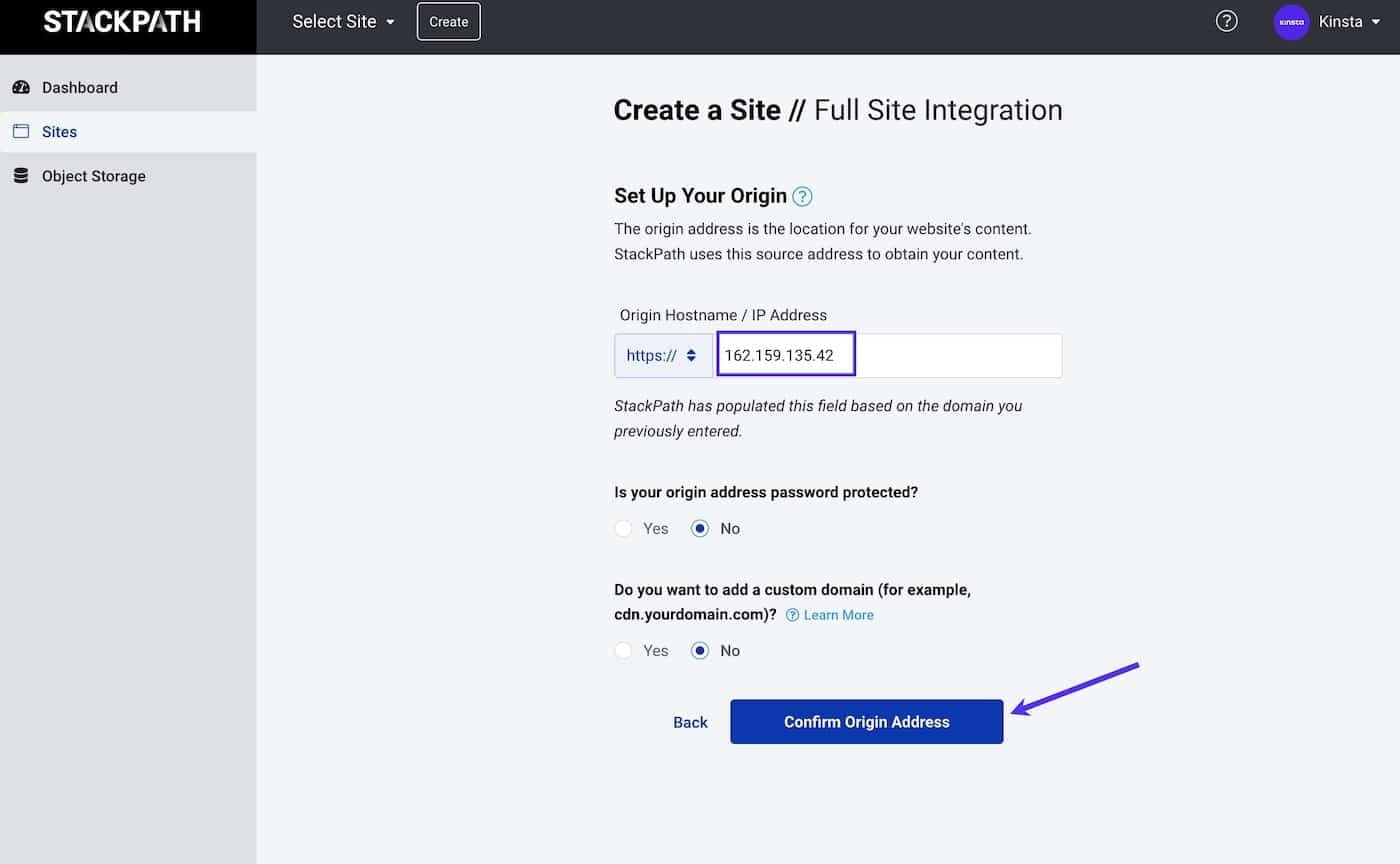
Step 2 – Confirm Origin Address
On the Set Up Your Origin page, make sure the IP address StackPath has automatically populated for your origin matches the Site IP address of your site in MyKinsta.
If your Kinsta site is password-protected, select Yes for “Is your origin address password protected?” Then, enter the Username and Password to use for authentication so StackPath can access the content.
It isn’t necessary to add a custom domain here since you’ve already set the delivery domain in the previous step.
Click the Confirm Origin Address button to continue to the next page.
Step 3 – Confirm SSL Method
For the SSL Method, using the free SSL provided by StackPath is recommended and will not interfere with the Cloudflare SSL included with our Cloudflare integration here at Kinsta.
You also have the option to upload an SSL certificate if your site uses a custom SSL you’ve purchased from a third party.
Once you’ve confirmed the domains you want to protect with SSL, click the Confirm SSL Method button.

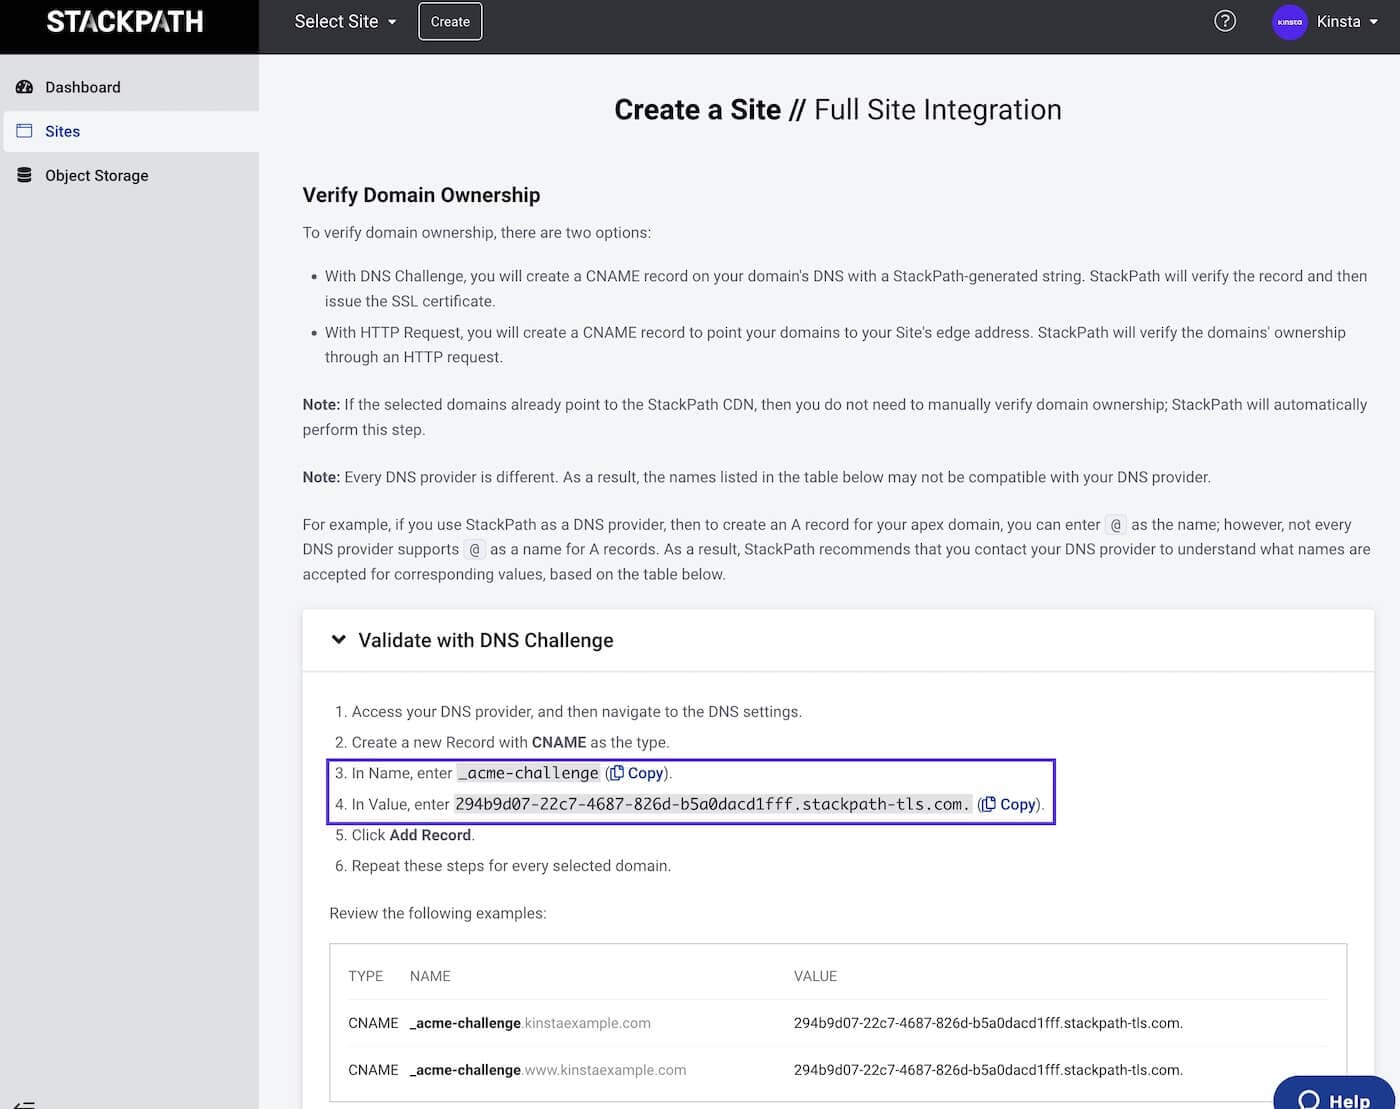
Step 4 – Verify Ownership
For the SSL certificate from StackPath to be issued, you’ll need to verify ownership of your domain. Two options are available, DNS Challenge or HTTP Request. We’ll use the DNS Challenge method in this example, with our DNS managed in Kinsta’s DNS.
If you have a different DNS provider (could be your registrar or another DNS host, depending on where you’ve pointed your domain’s nameservers), the steps may be a little different.
Click on each copy (clipboard) icon next to Name and Value to copy the details for the custom CNAME you’ll need to add to your DNS records for verification.
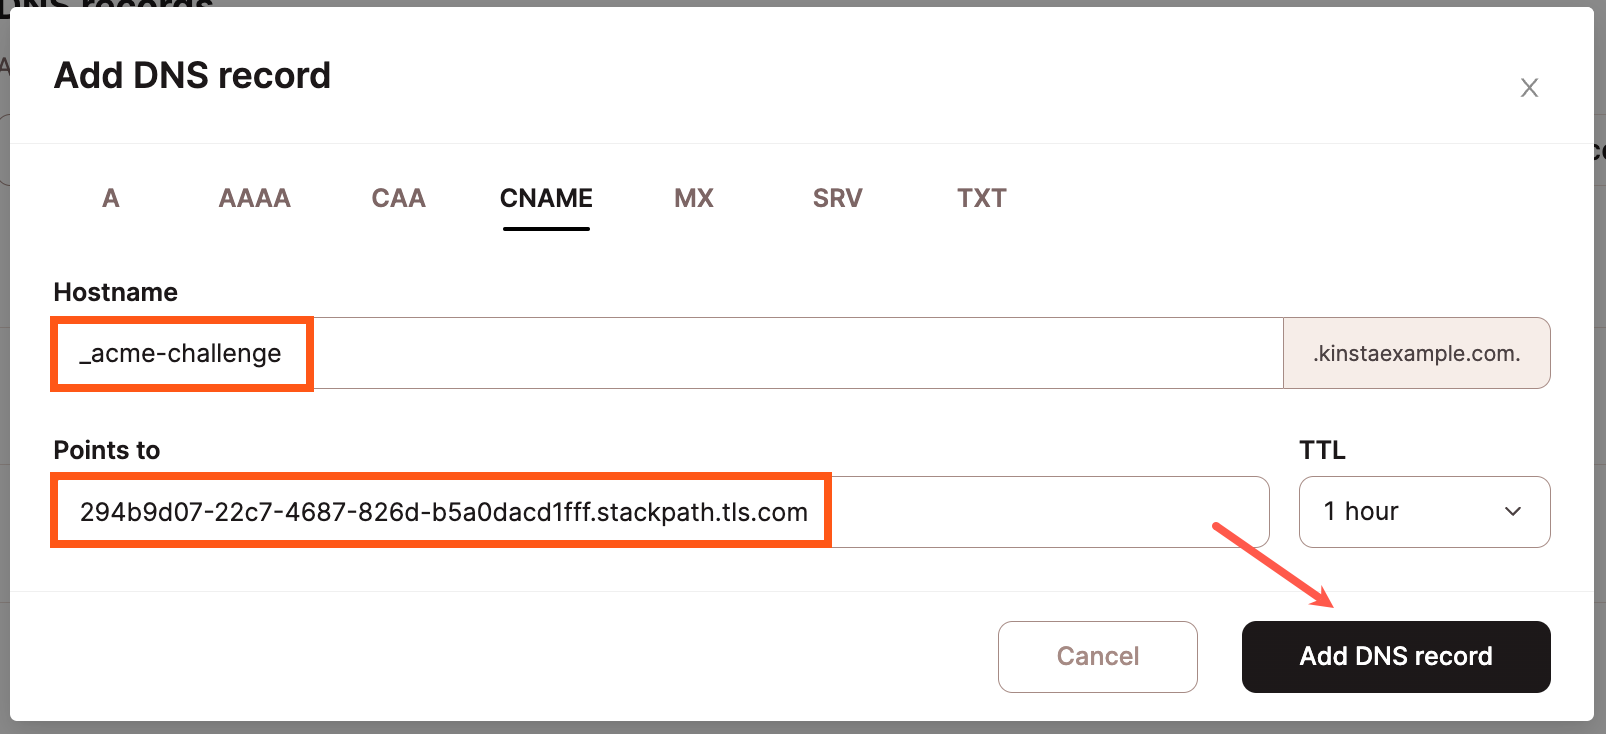
To add the new CNAME record in Kinsta’s DNS, log in to MyKinsta and click on DNS in the left sidebar navigation.
- Click on the domain you want to add a DNS record to.
- Click the Add a DNS record button.
- Click the CNAME tab and add the Hostname (Name) and Points to (Value) details you copied from the Verify Domain Ownership page at StackPath. Click the Add DNS record button to save your new CNAME record.
Note: Depending on your DNS record’s TTL setting, it may take anywhere from a few minutes to hours for the DNS record to propagate.
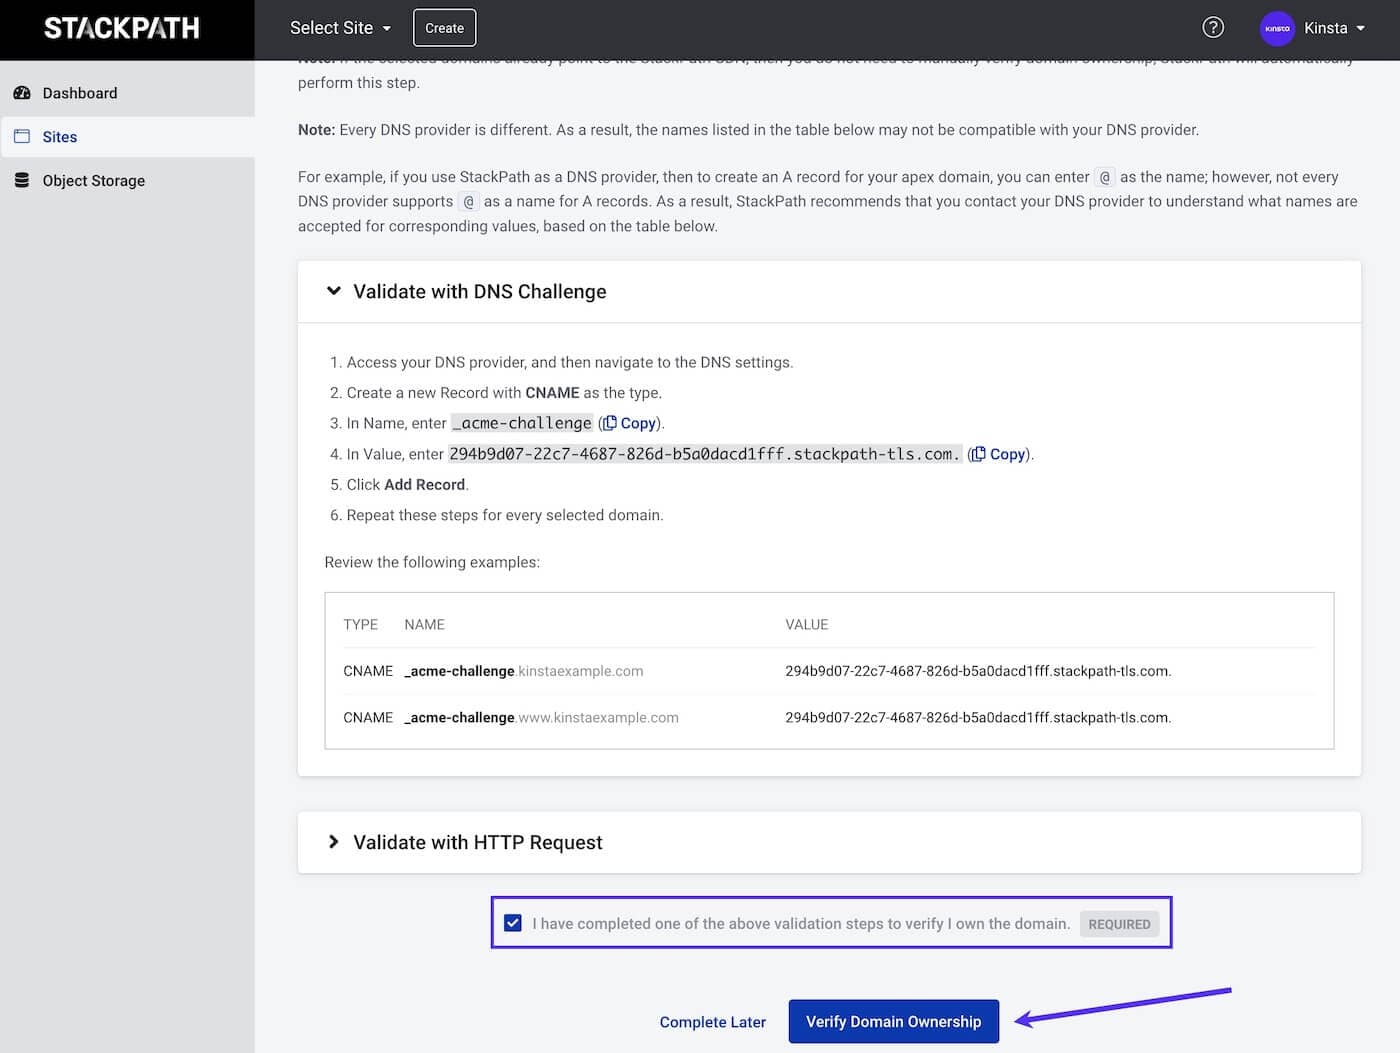
Step 5 – Complete Verification
Back in StackPath, check the box next to “I have completed one of the above validation steps to verify I own the domain.” and click the Verify Domain Ownership button.
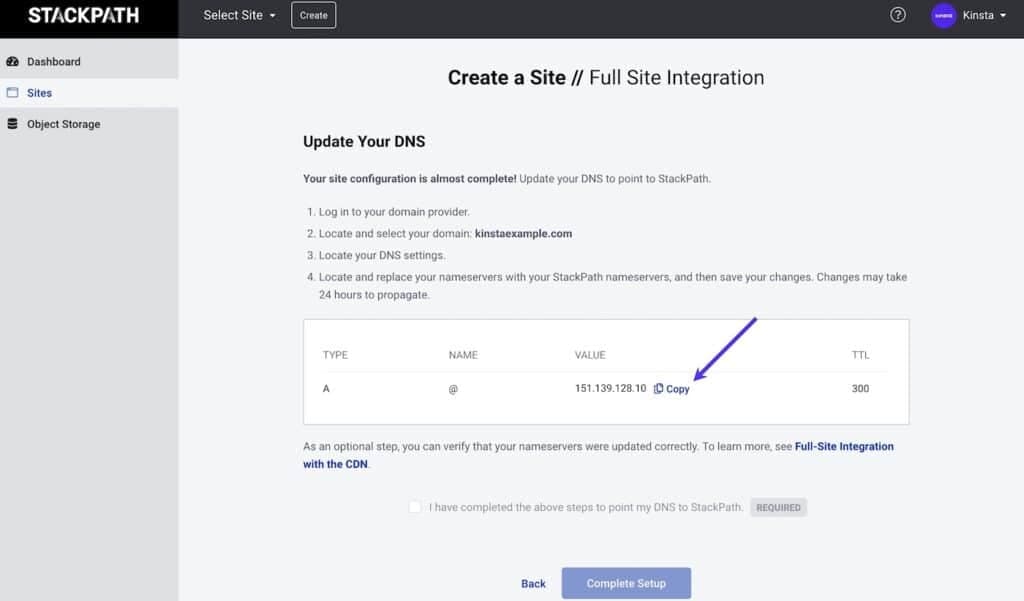
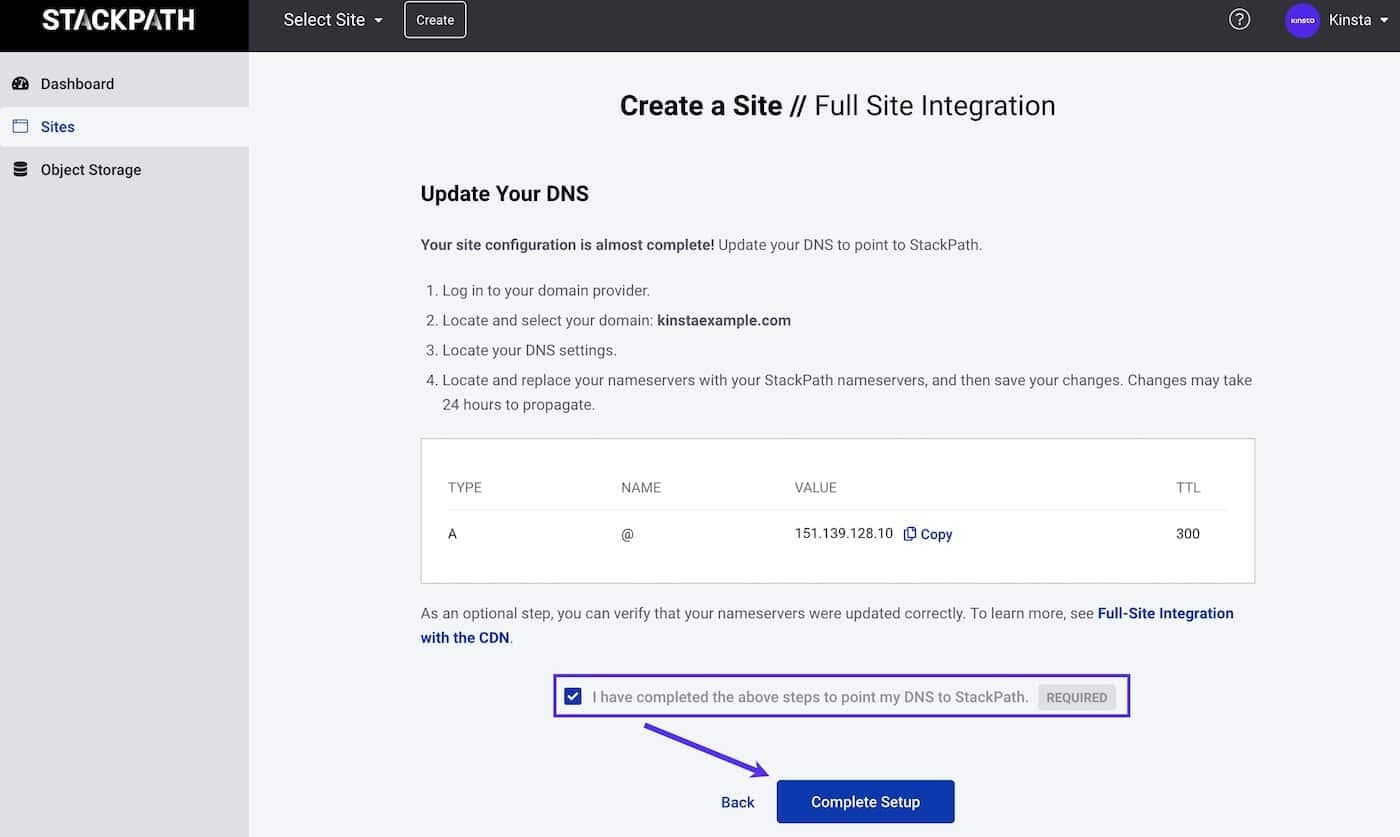
Step 6 – Point Your DNS
Once DNS has propagated, your domain ownership is verified and you’ll see information on pointing your DNS to StackPath. Click on the copy (clipboard) icon to copy the IP address shown.
Step 7 – Update Kinsta’s DNS
Once again, we’ll be showing you how to do this in Kinsta’s DNS. These steps may vary depending on your DNS provider.
- If you aren’t already in DNS in MyKinsta, click on DNS in the left sidebar navigation.
- Click on the domain you want to add a DNS record to.
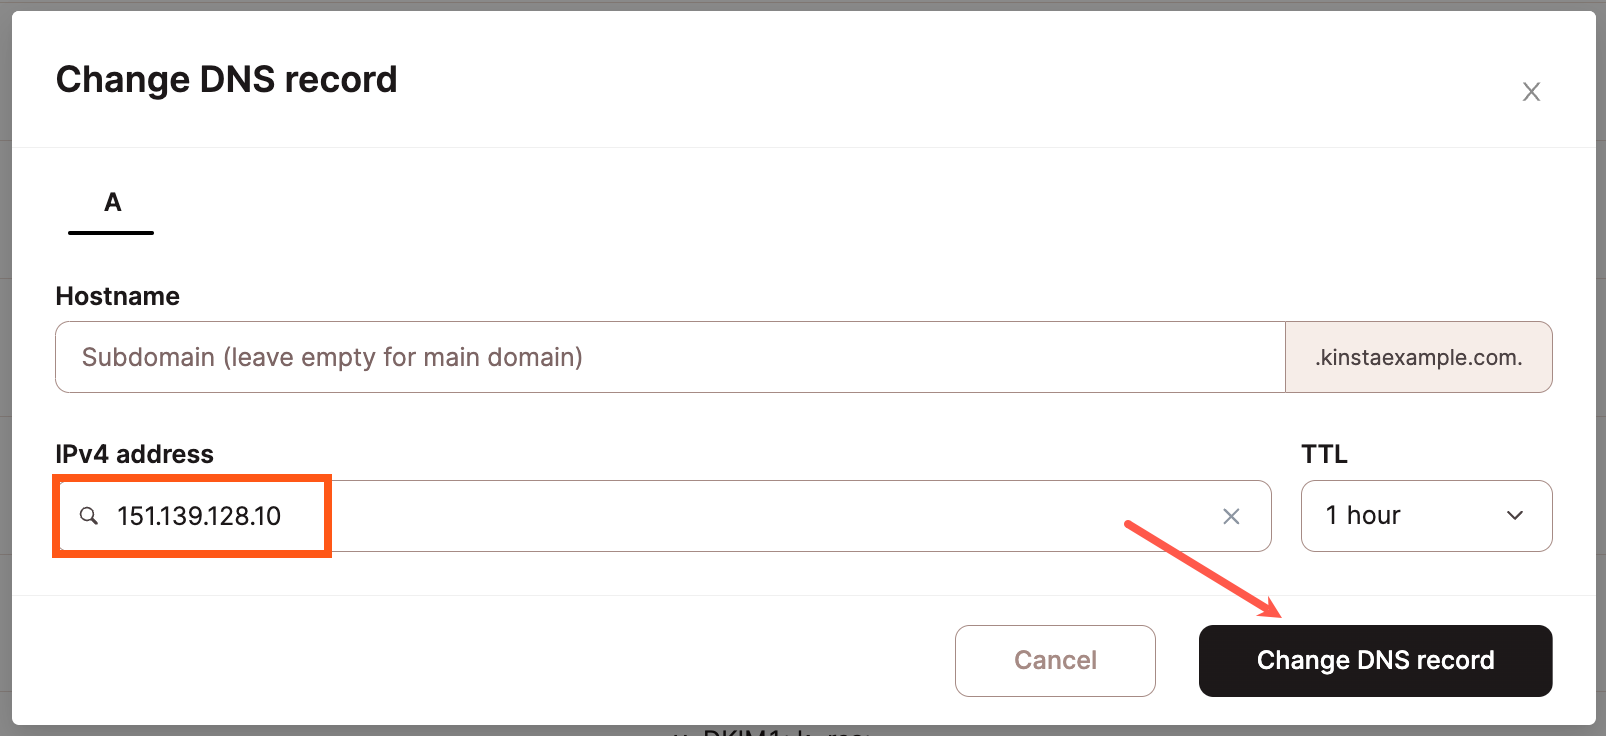
- If you already have an existing A record for your domain, click the Edit (pencil) icon to update this to the first IP address shown at StackPath. Otherwise, click the Add a DNS record button.
- Leave the Hostname blank unless you’re adding the A record to a subdomain.
- IPv4 Address: The IP address you copied from StackPath.
- Click the Change DNS record button (updating a DNS record) or Add DNS record button (adding a new DNS record) to save your DNS record.

Change your A record to point to StackPath. 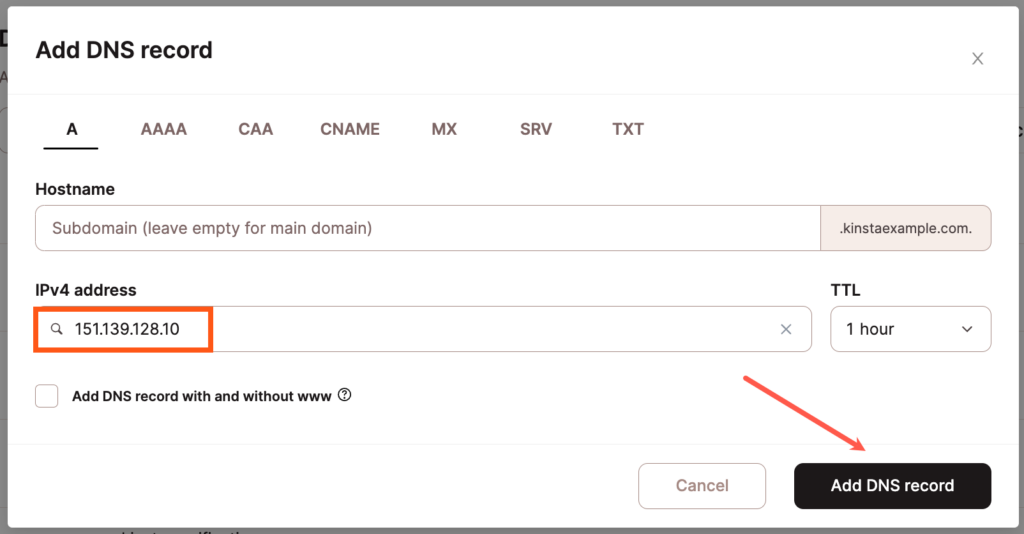
Add an A record to point to StackPath.

Note: It may take up to 1 hour for your DNS records to propagate.
Step 8 – Complete Setup
Back in your StackPath dashboard, check the box confirming you’ve completed the steps to update DNS and click the Complete Setup button.
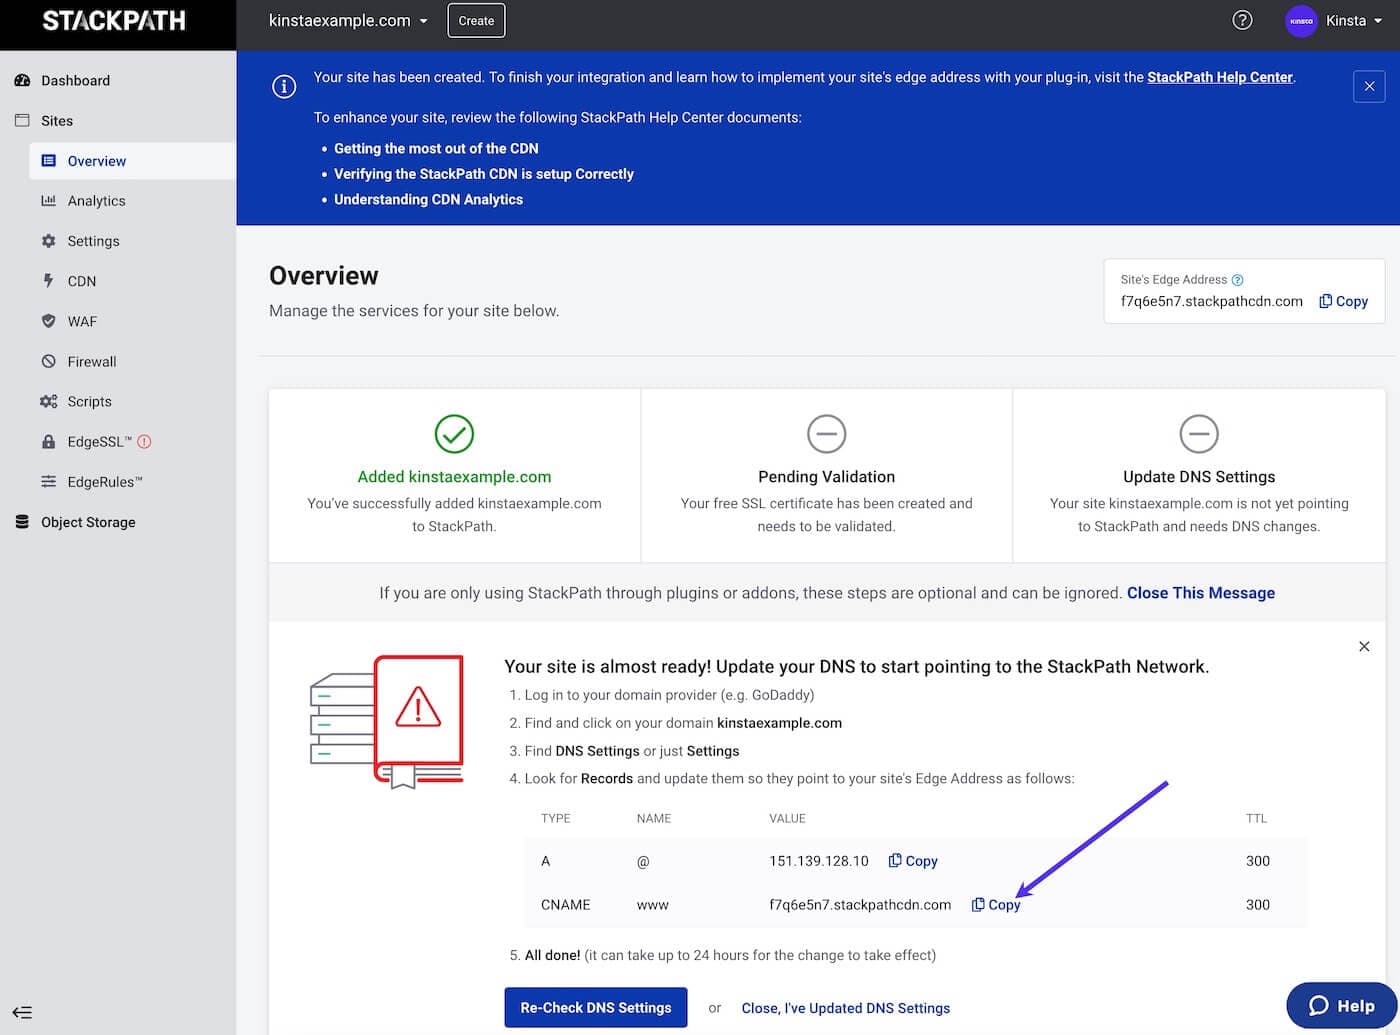
Step 9 – Additional DNS Records
You’ll be taken to the Overview page for your site in StackPath. You should see an additional DNS record that needs to be added or changed for the www CNAME (www.example.com). Click on the copy (clipboard) icon to copy the value.
Step 10 – Add CNAME Records
Once again, we’ll be showing you how to add or edit this DNS record in Kinsta’s DNS. These steps may vary depending on your DNS provider.
- If you already have an existing CNAME record for the www hostname, click the Edit (pencil) icon to update it. Otherwise, click the Add a DNS record button and select the CNAME tab.
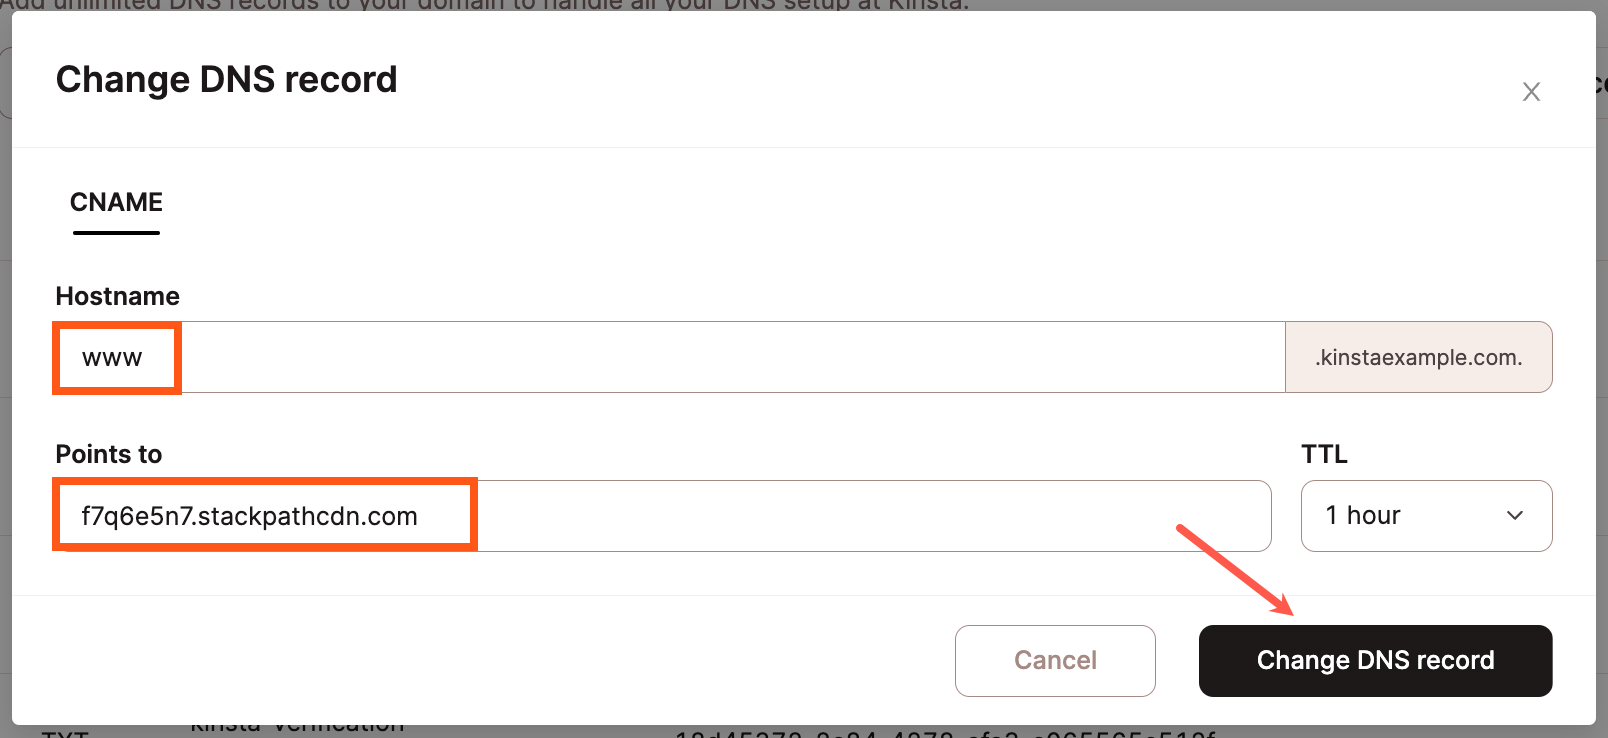
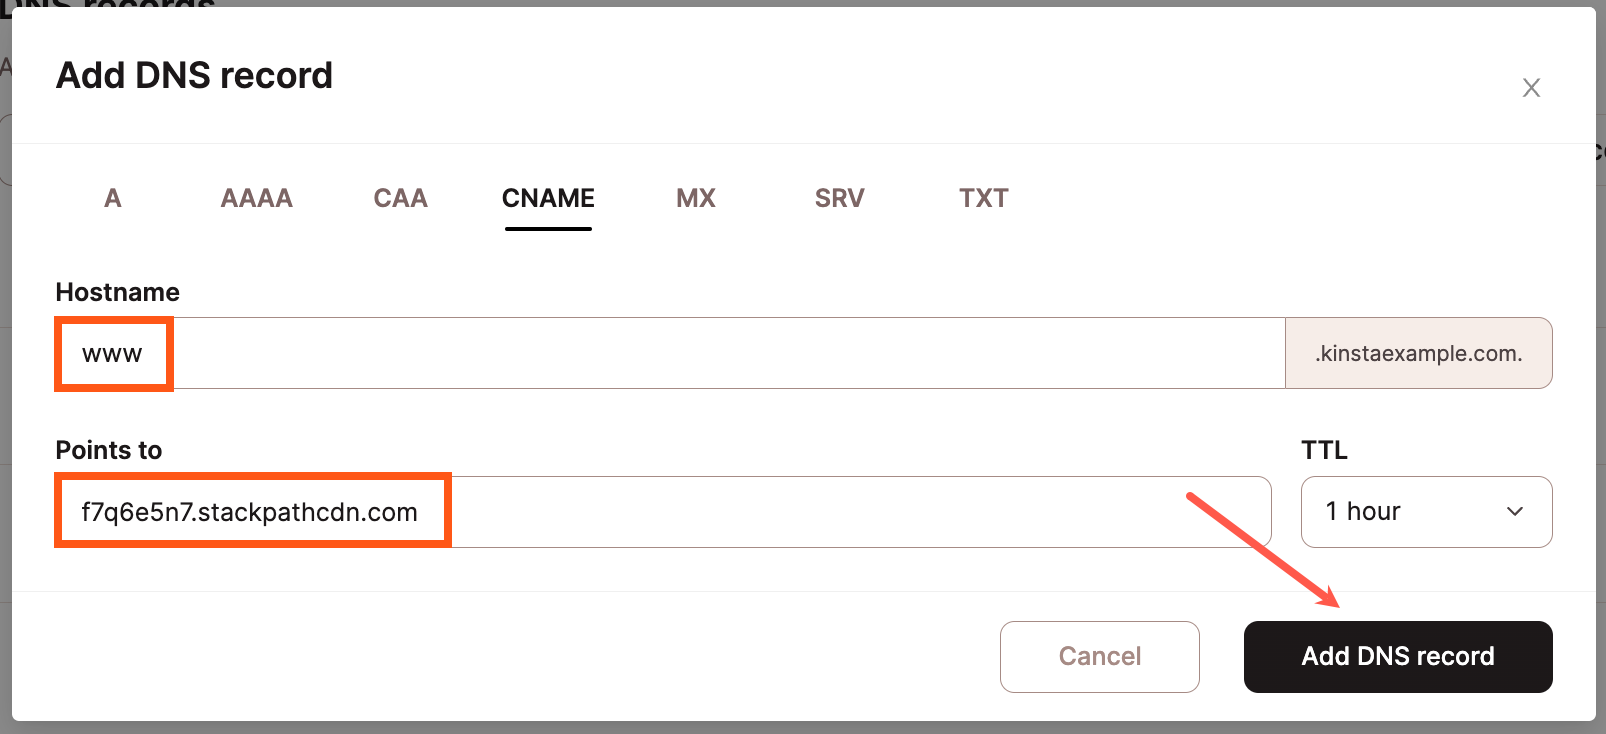
- Hostname: www
- Points to: The hostname to point www to as shown in StackPath.
- Click the Change DNS record button (updating a DNS record) or Add DNS record button (adding a new DNS record) to save your DNS record.

Edit your www CNAME record to point to StackPath. 
Add a www CNAME record to point to StackPath.
Note: It may take up to 1 hour for your DNS records to propagate.
Step 11 – Re-Check DNS Settings
Back in your StackPath dashboard, click the Re-Check DNS Settings button.
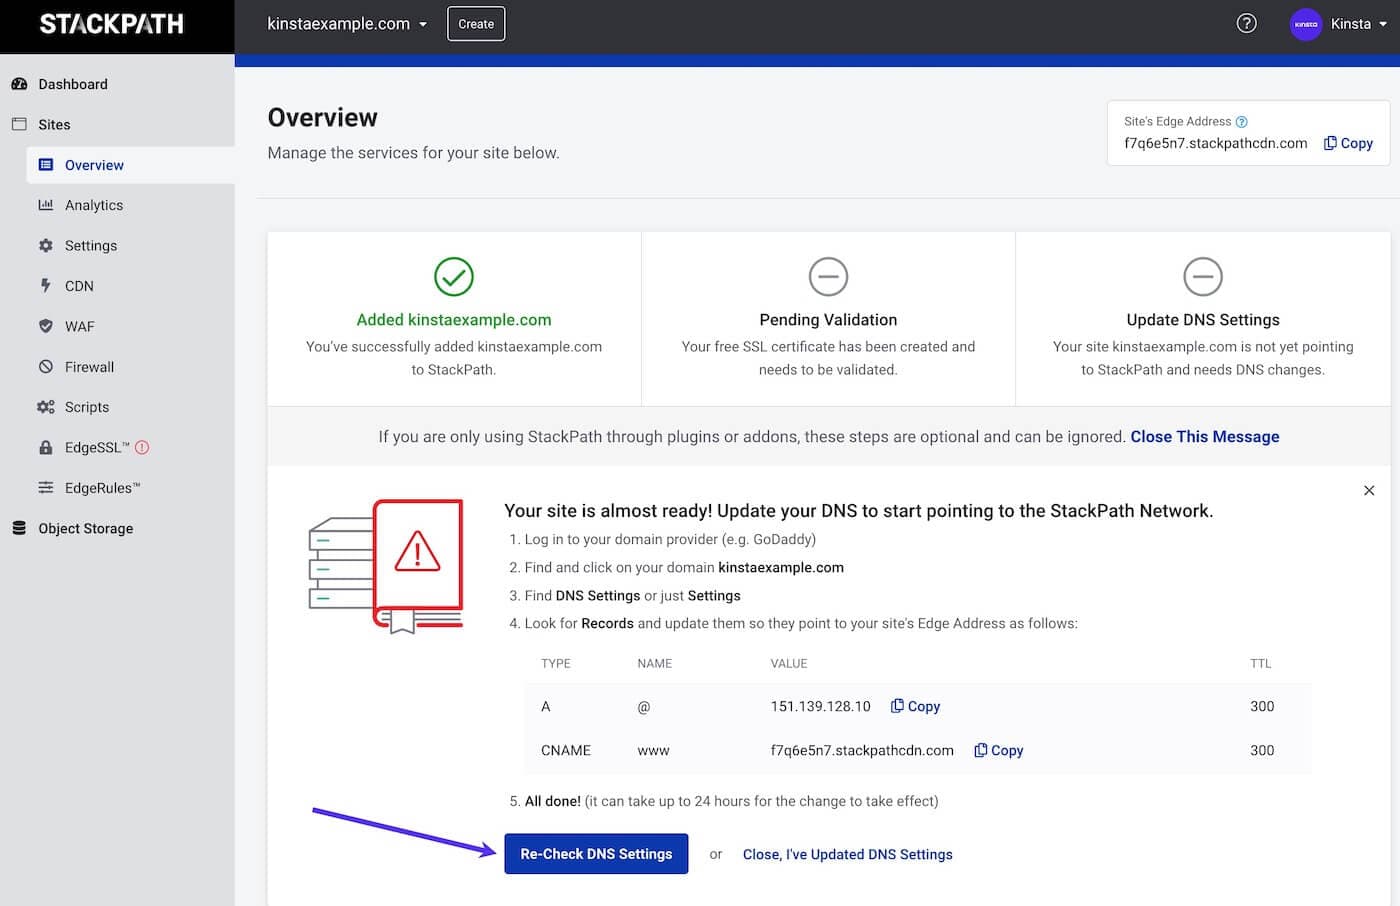
Your site is now connected to StackPath’s CDN, and you’re ready to check and configure settings (below) to finish up.
Static Assets Integration
Step 1 – Set up Your Origin
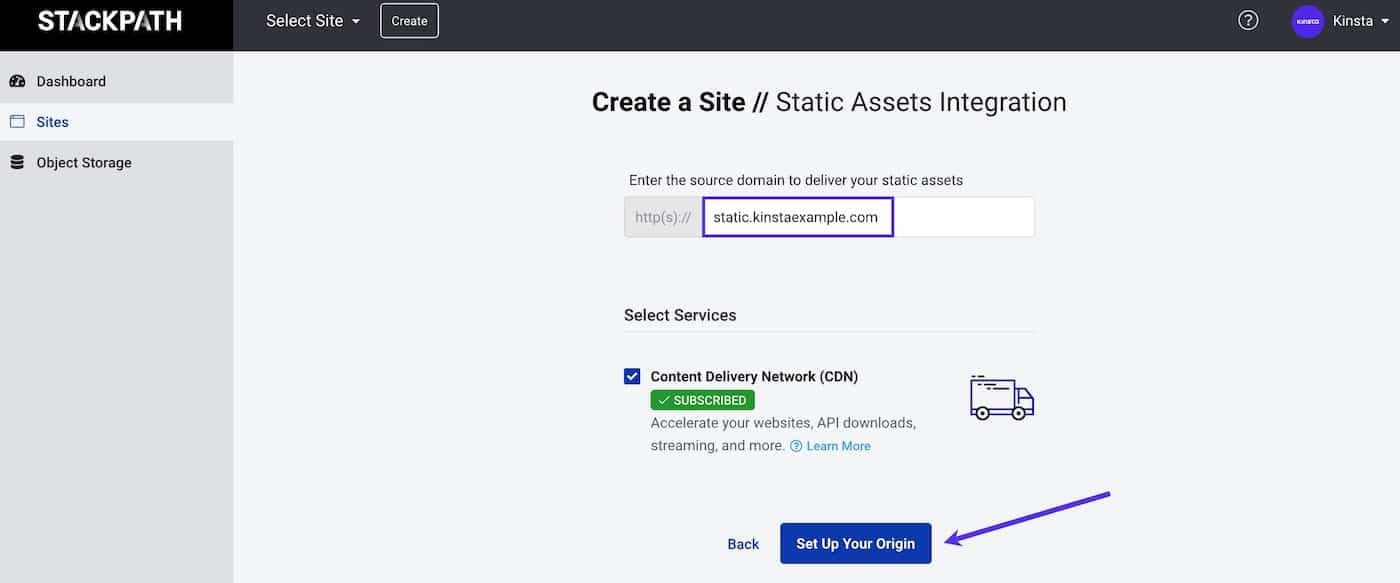
Once you’ve selected Static Assets Integration and advanced to the next page, enter the subdomain for your static assets, make sure Content Delivery Network (CDN) is checked, and click the Set Up Your Origin button.
Step 2 – Complete Setup
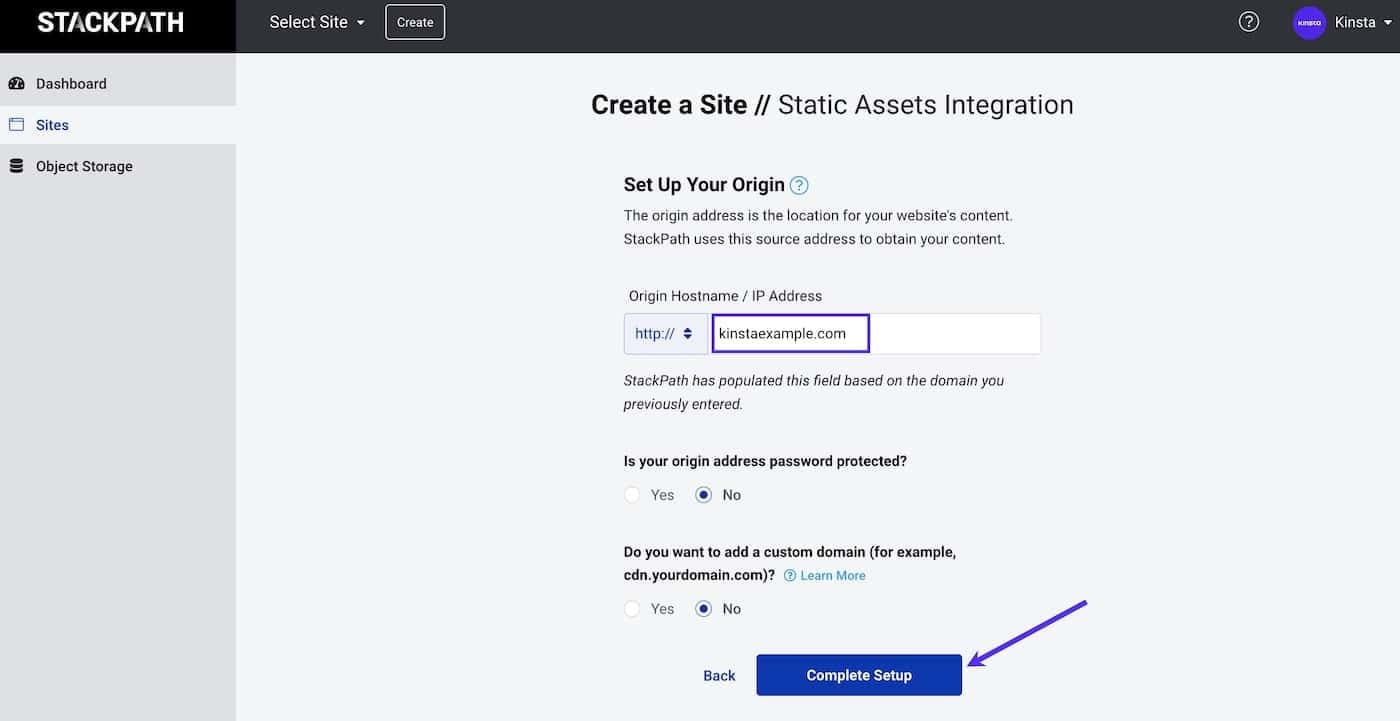
On the Set Up Your Origin page, enter your site’s primary domain name in the Origin Hostname field.
If your Kinsta site is password-protected, select Yes for “Is your origin address password protected?” Then, enter the Username and Password to use for authentication so StackPath can access the content.
It isn’t necessary to add a custom domain here since you’ve already set the delivery domain in the previous step.
Click the Complete Setup button to continue to the next page.
Step 3 – Configure SSL
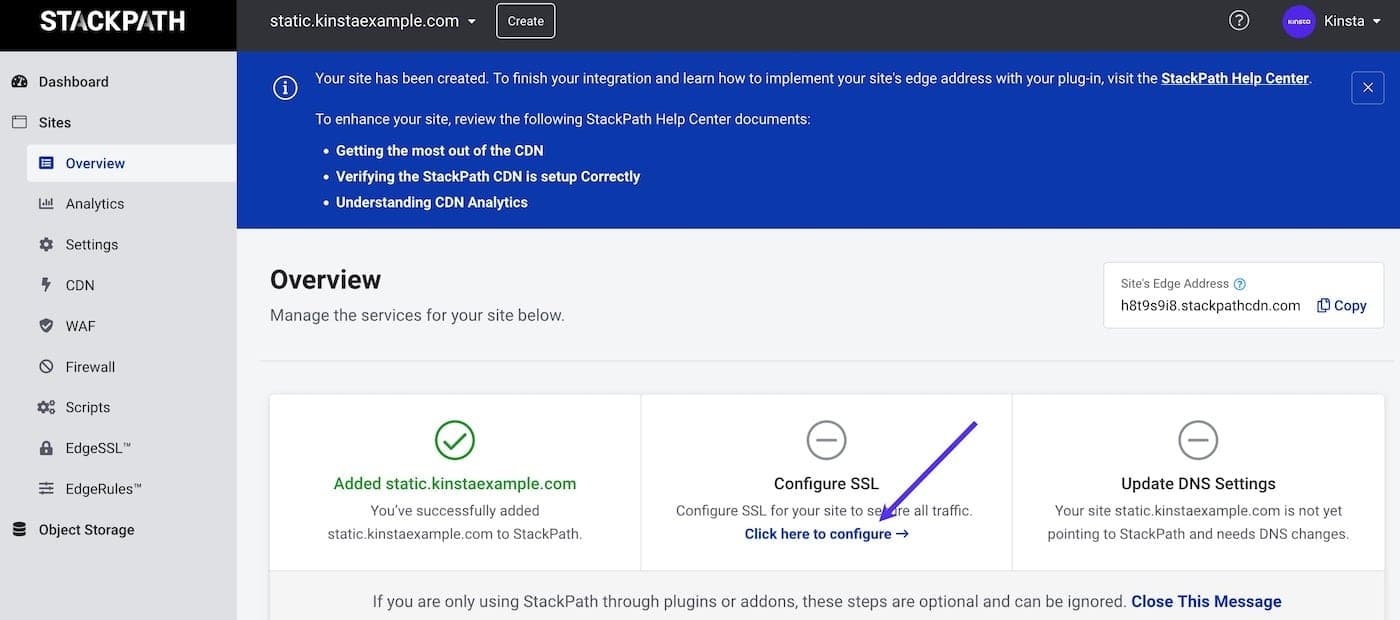
You’ll be taken to the Overview page for your site in StackPath. From here, you can access a couple of more steps that are needed to finish setting things up, starting with configuring an SSL certificate for your subdomain. For StackPath to securely serve your static assets on your subdomain, you’ll need to validate the subdomain and add a custom SSL certificate in StackPath. Click on the Click here to configure link under Configure SSL to get started.
Step 4 – Create Certificate
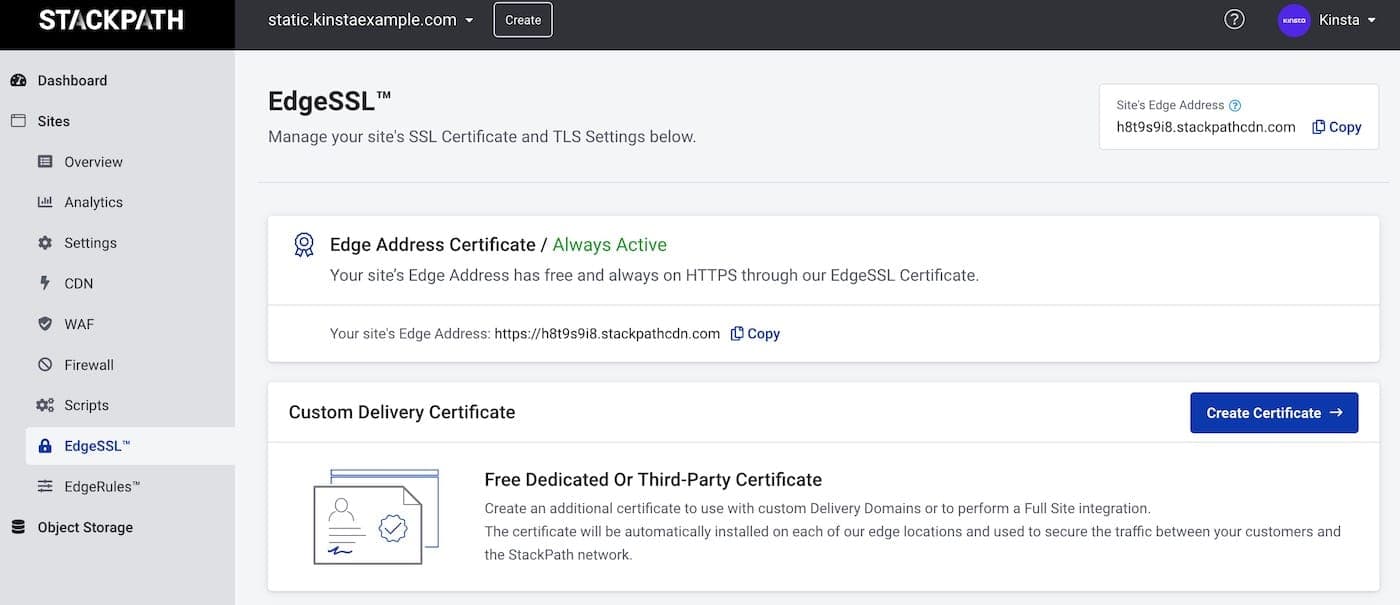
On the EdgeSSL page, click the Create Certificate button.
Step 5 – Generate Certificate
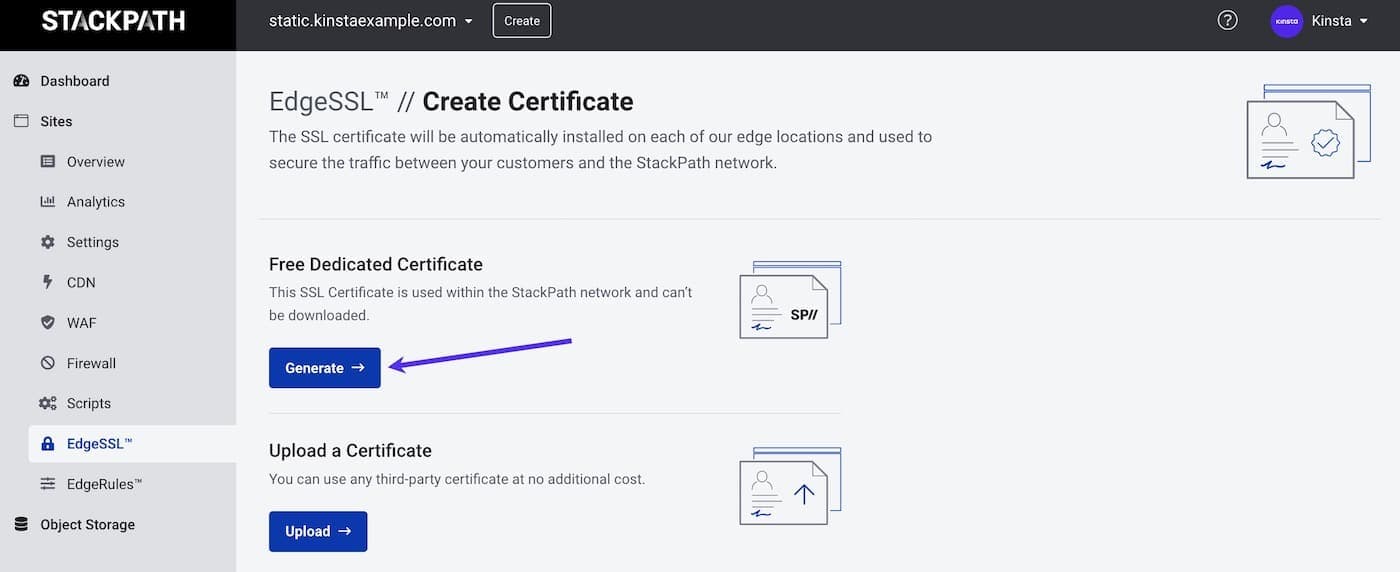
The Free Dedicated Certificate provided by StackPath is recommended and will not interfere with the Cloudflare SSL included with our Cloudflare integration here at Kinsta.
You also have the option to upload an SSL certificate if you prefer to use an SSL certificate you’ve purchased from a third party.
Click the Generate button under Free Dedicated Certificate to begin creating your custom certificate at StackPath.
Step 6 – Validate
Select your custom subdomain and click the Continue to Validation button.

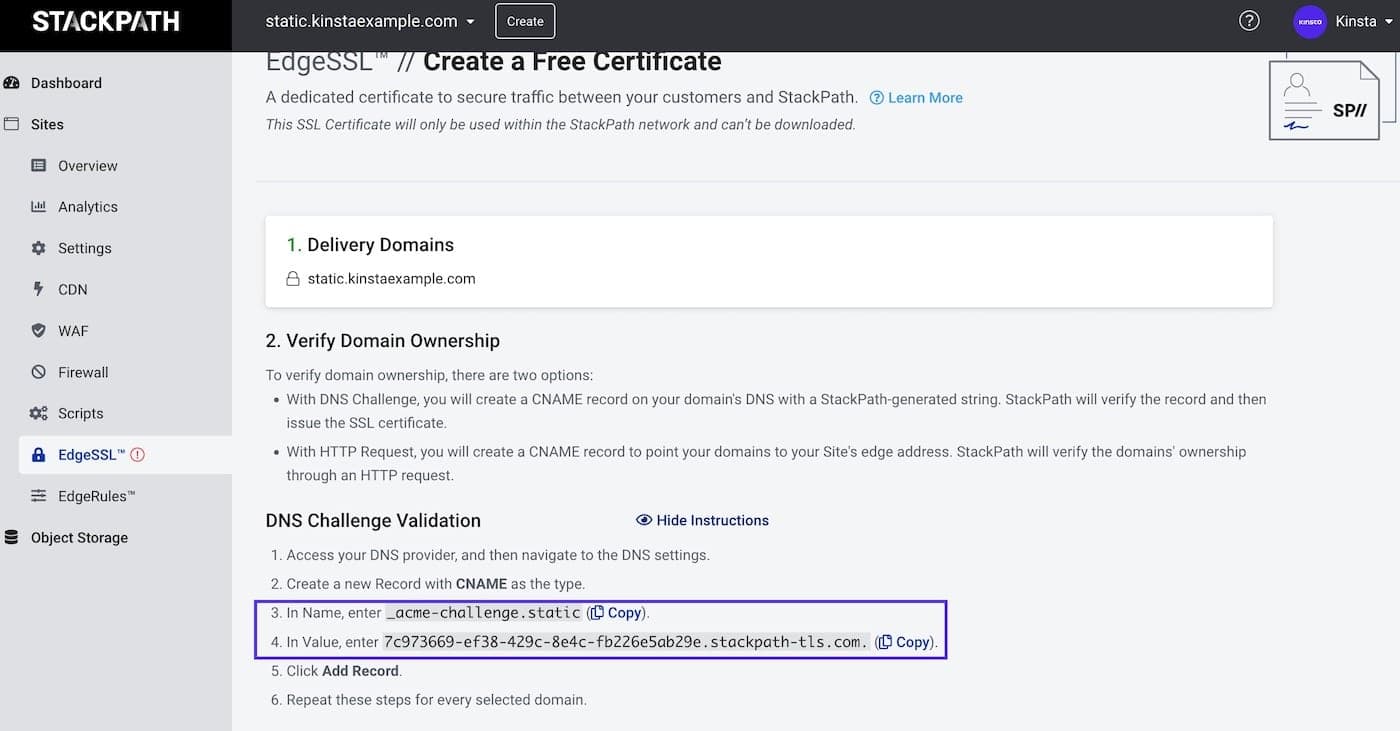
Step 7 – Challenge Validation
For the SSL certificate from StackPath to be issued, you’ll need to verify ownership of your domain. Two options are available, DNS Challenge or HTTP Request. We’ll use the DNS Challenge method in this example, with our DNS managed in Kinsta’s DNS.
If you have a different DNS provider (could be your registrar or another DNS host, depending on where you’ve pointed your domain’s nameservers), the steps may be a little different.
Click the Show Instructions link next to DNS Challenge Validation and click on each copy (clipboard) icon next to Name and Value to copy the details for the custom CNAME you’ll need to add to your DNS records for verification.
To add the new CNAME record in Kinsta’s DNS, log in to MyKinsta and click on DNS in the left sidebar navigation.
- Click on the domain you want to add a DNS record to.
- Click the Add a DNS record button.
- Click the CNAME tab and add the Hostname (Name) and Points to (Value) details you copied from the Verify Domain Ownership page at StackPath. Click the Add DNS record button to save your new CNAME record.
Note: Depending on your DNS record’s TTL setting, it may take anywhere from a few minutes to hours for the DNS record to propagate.
Step 8 – Confirm Configuration
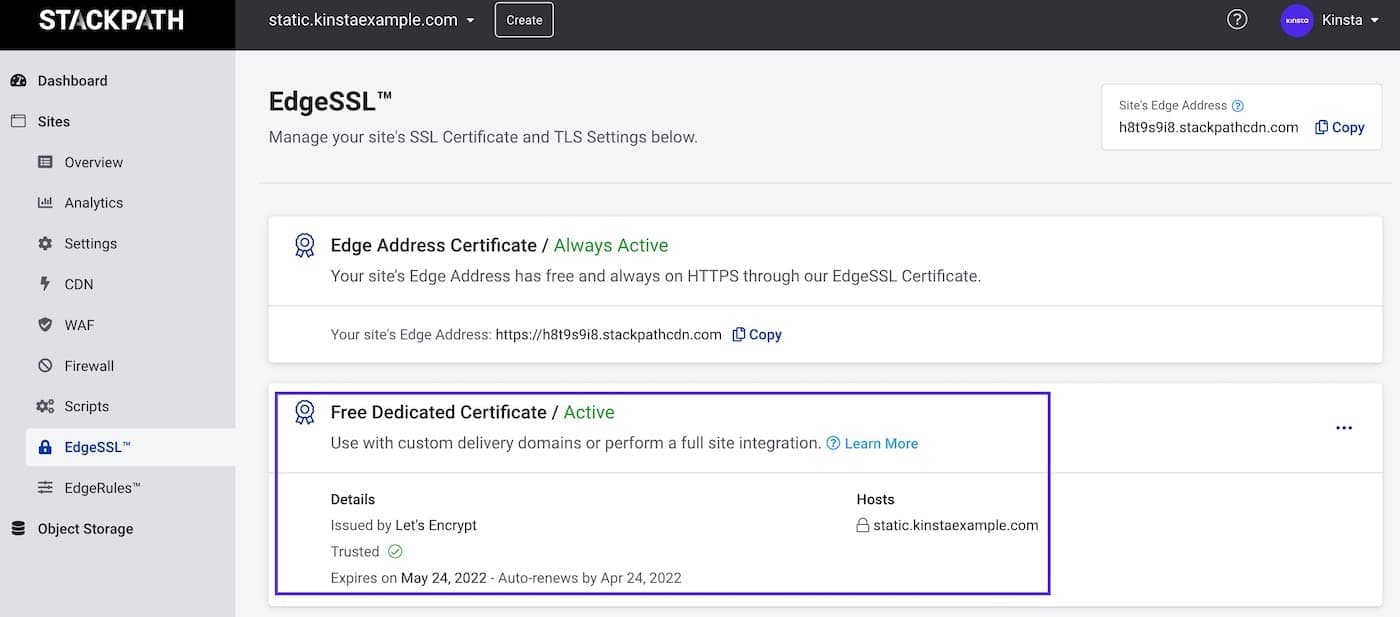
Back in StackPath, click on the I’ve configured my DNS. Continue button. On the EdgeSSL page, you should see your Free Dedicated Certificate is active. If not, give DNS more time to propagate and for your certificate to be activated.
Step 9 – Point Your Subdomain
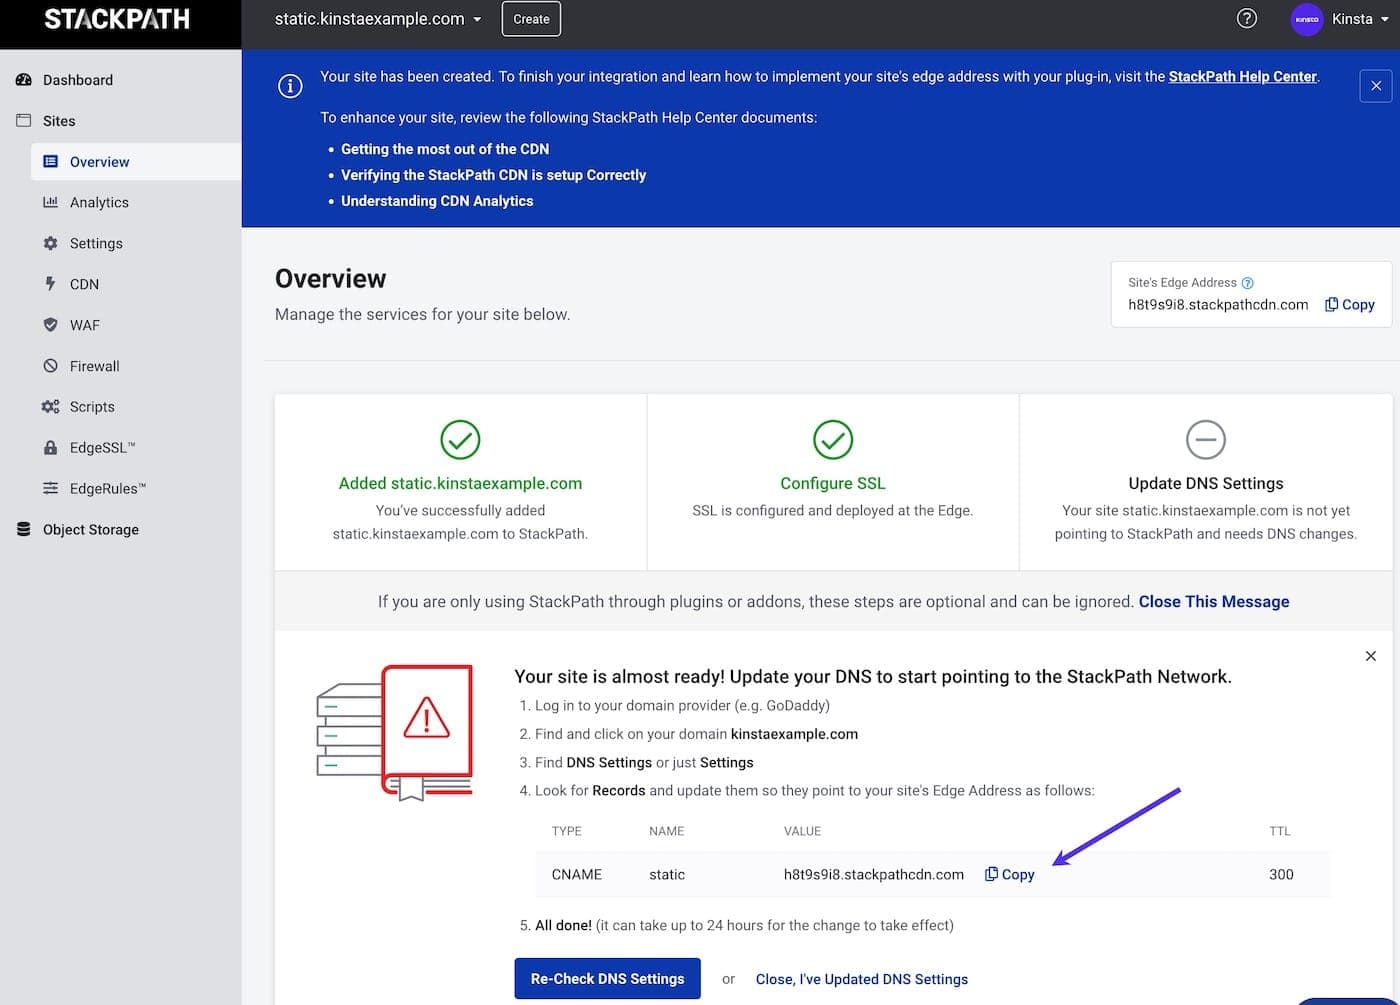
The next step is to point your subdomain to StackPath so the CDN can serve your static assets. Go to the Overview page and click on the copy (clipboard) icon to copy the CNAME value.
Step 10 – Add CNAME Records
Once again, we’ll be showing you how to add or edit this DNS record in Kinsta’s DNS. These steps may vary depending on your DNS provider.
- If you aren’t already in DNS in MyKinsta, click on DNS in the left sidebar navigation.
- Click on the domain you want to add a DNS record to.
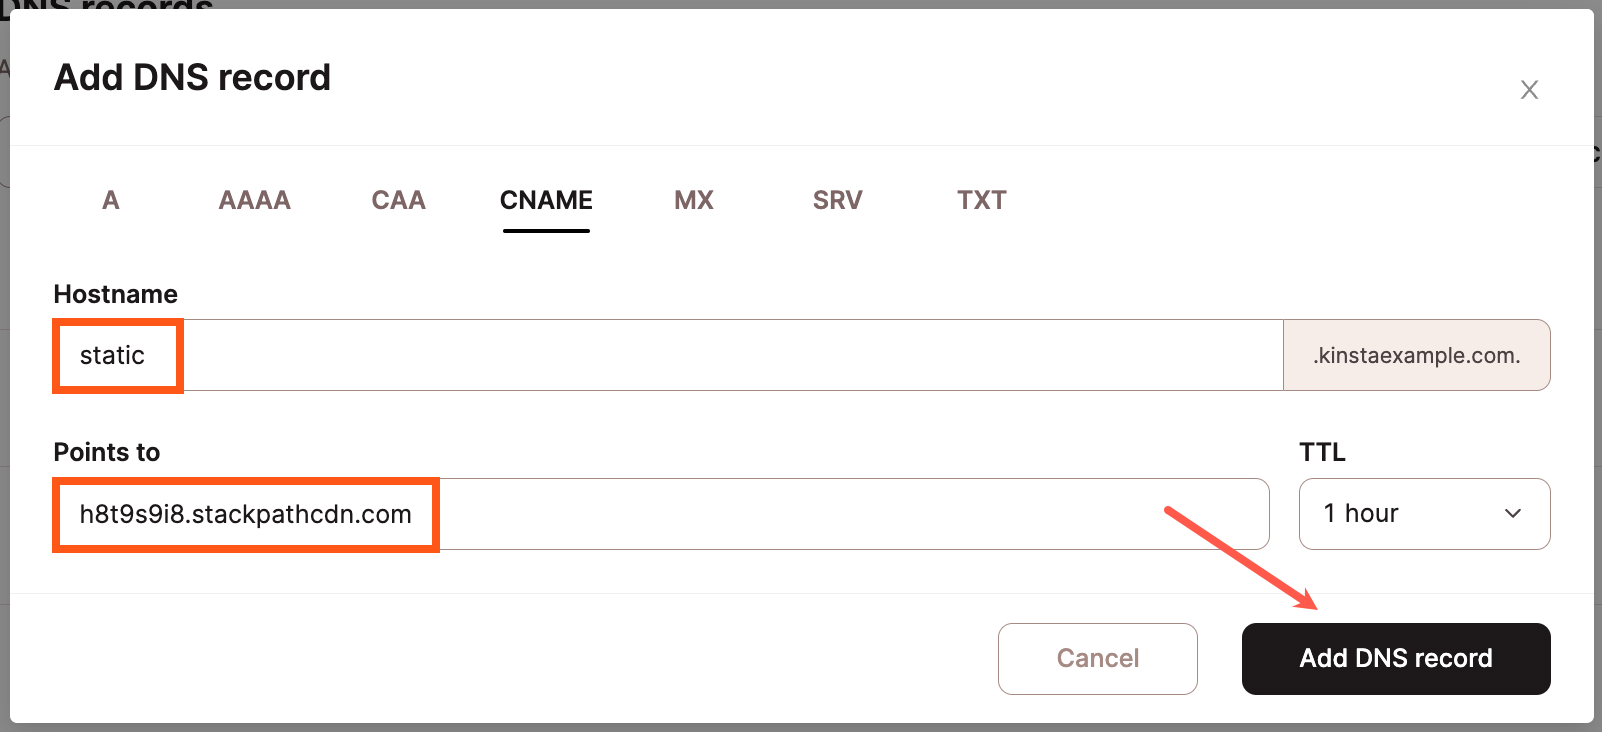
- Click the Add a DNS record button.
- Click the CNAME tab and add the first part of your subdomain in the Hostname (e.g. static) field.
- Add the Value you copied from StackPath in the Points to field.
- Click the Add DNS record button to save your new CNAME record.

Add the CNAME record for your static assets subdomain.
Note: It may take up to 1 hour for your DNS records to propagate.
Step 11 – Re-Check DNS Settings
Back in StackPath, click the Re-Check DNS Settings button on the Overview page.
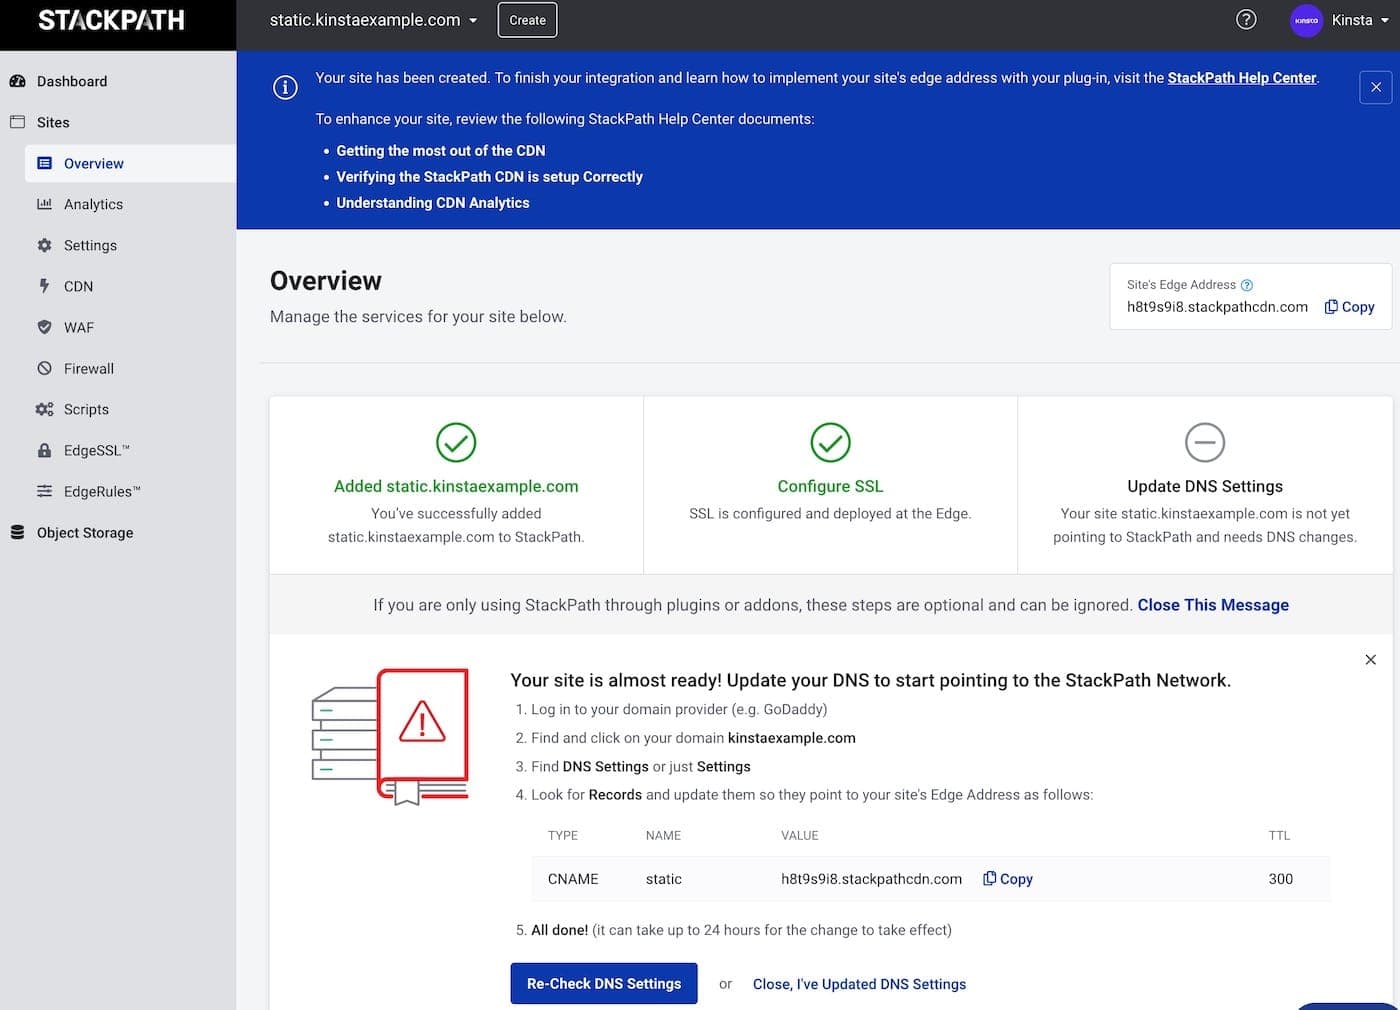
If necessary, allow more time for DNS to propagate and re-check the DNS settings again. Once DNS propagates, the instructions to point your site will disappear, and you’ll see options for managing your site on the Overview page.
Step 12 – Save and Validate
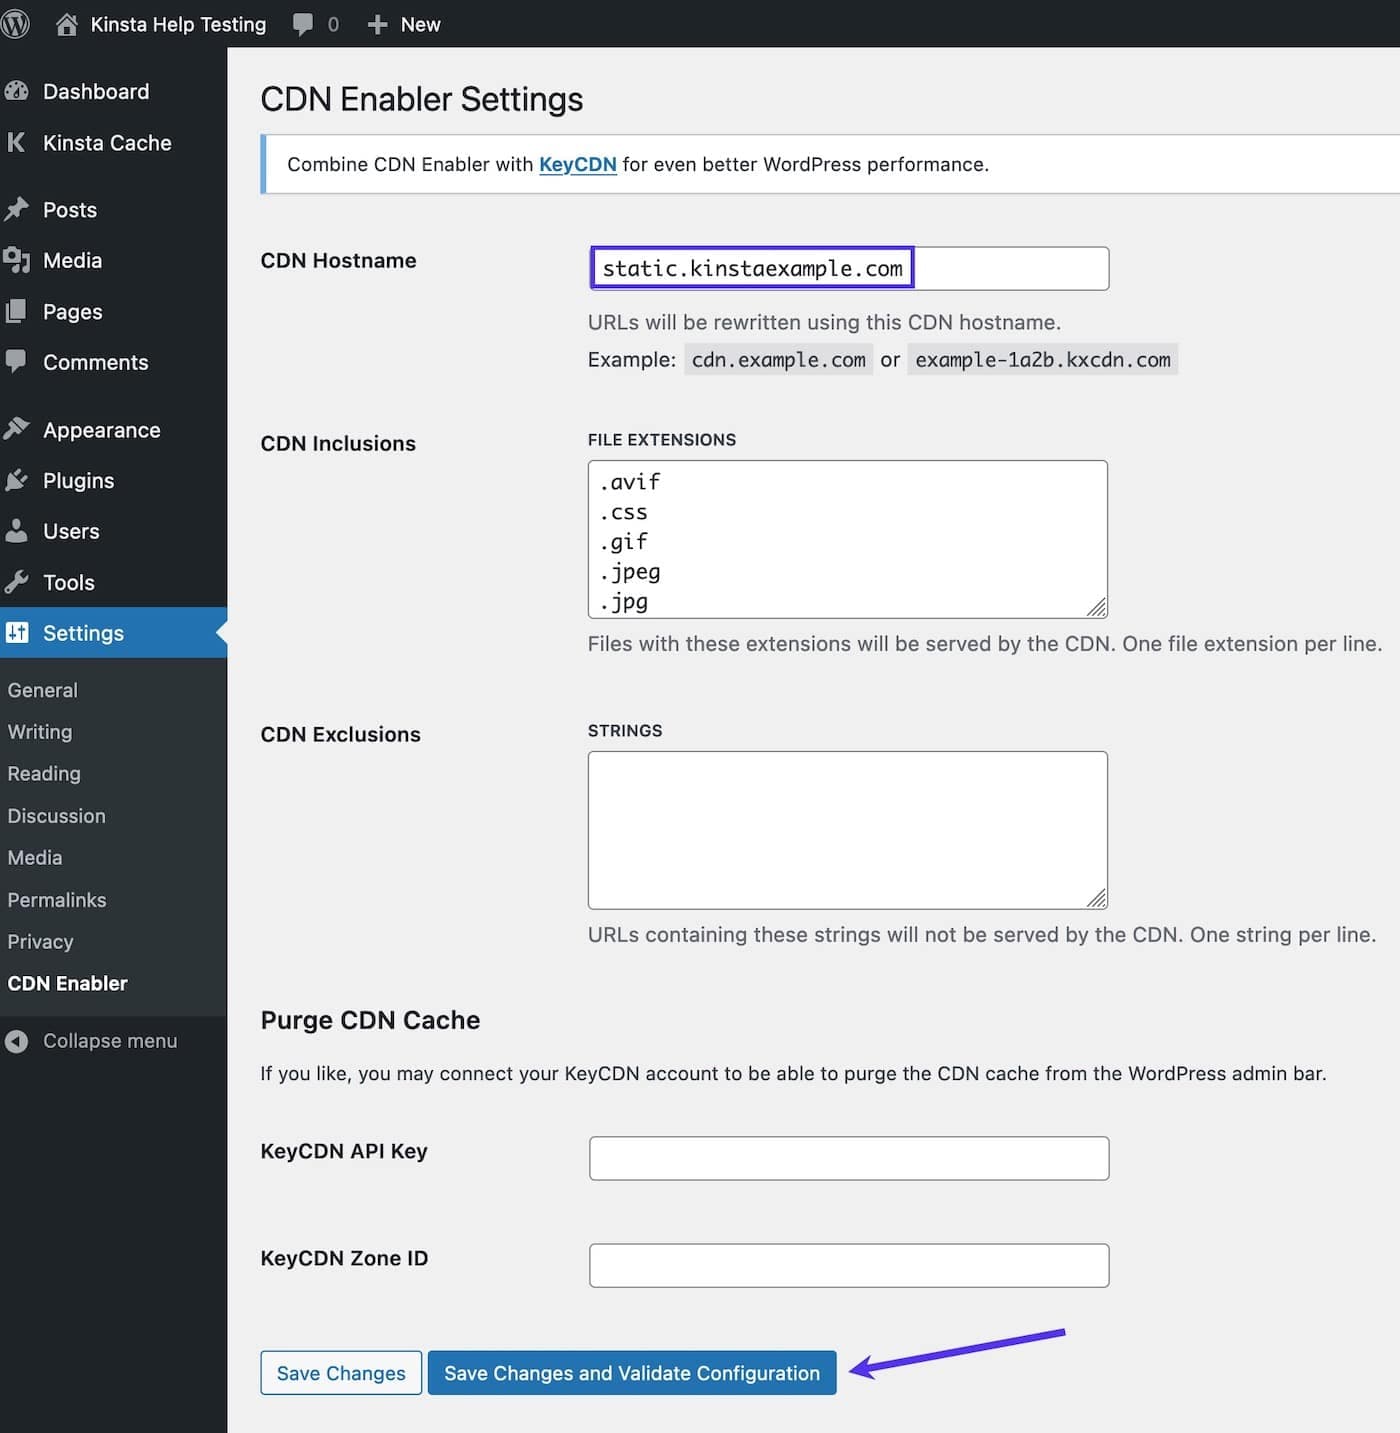
To rewrite the static asset URLs from the StackPath edge address to your subdomain, you’ll need to add and configure the CDN Enabler plugin. This plugin is made by KeyCDN but works with other CDNs too. Once the plugin is installed and activated, go to the plugin’s settings page, enter the custom subdomain for your site’s static assets (e.g. static.example.com), and click the Save Changes and Validate Configuration button.
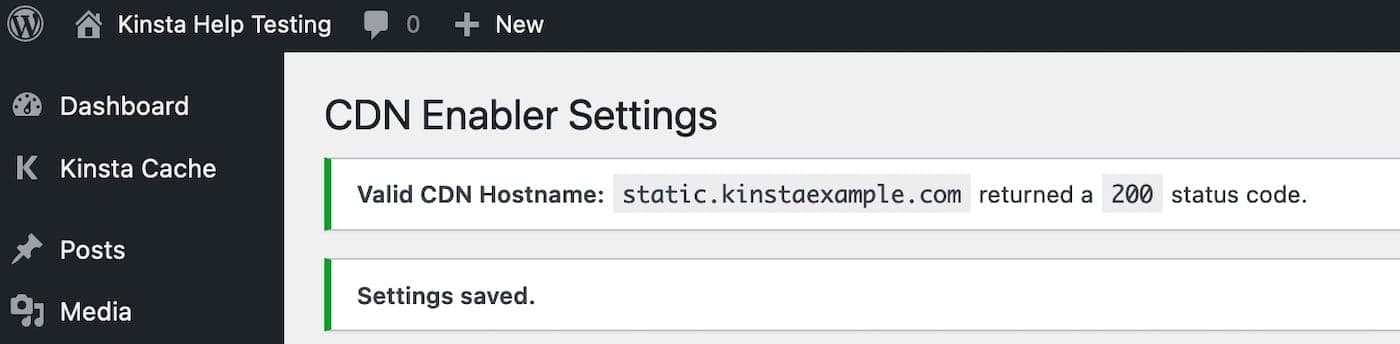
If everything is configured correctly, you’ll see a success message confirming that the CDN hostname is valid and returns a 200 status. If you see any errors when saving, double-check all of the settings above, the spelling of your subdomain, and make sure DNS has propagated.
Your site is now connected to StackPath, StackPath’s CDN is serving the static assets, and you’re ready to check and configure settings (in the next section) to finish up.
Configure StackPath Settings
Now that your domain is fully pointed to StackPath, you can begin adjusting and checking a few settings for best compatibility with Kinsta’s Cloudflare integration.
Settings
(Sites > Settings)
Pull Protocol: Set this to HTTPS Only to avoid redirect loops/errors.
CDN
(Sites > CDN)
- Query String Control: Leave this with the default setting of Cache all Query Strings to avoid loading incorrect content.
- Content Persistence: This is disabled by default but can be enabled if you want to ensure content availability in the event your origin is offline.
- URL Caching: Leave this disabled, especially if you have a dynamic site. If you have a dynamic site and wish to cache certain sections without file extensions, create a custom EdgeRule instead.
Other Configuration and Settings
- Sites > EdgeSSL > Force HTTPS Connections: To redirect all visitors to HTTPS instead of HTTP, either Force HTTPS in MyKinsta or Enable Force HTTPS at StackPath. Do not enable both options, as this will likely cause redirect errors and loops.
- Sites > EdgeRules > Delivery Rule: Under certain circumstances, accidental caching of the admin toolbar and other user elements may happen. To prevent this potentially serious security risk, you’ll need to create a new Delivery Rule:
- If: Cookie Matches wordpres_logged_in*
- Then: Bypass Cache
- Sites > EdgeRules > Force www Connections: We recommend leaving this disabled as it may conflict with multiple domains and the Host header. If enabled, make sure DNS for the www subdomain (www.example.com) is pointed to StackPath.
Now your site is set up and configured at StackPath. Check out some common issues and solutions in the troubleshooting section below if you run into any issues.
Troubleshooting Common StackPath Issues
Now that you’ve set up your site with StackPath, there could be times when something isn’t working quite as expected. With an additional CDN layer, there are a few things to try when troubleshooting. We’ve covered the most common ones below.
Changes Aren’t Showing up on Your Site
Using StackPath with your site creates an additional layer of caching that will need to be cleared anytime you need to clear the cache. If you’re having trouble seeing changes on your site or a plugin isn’t behaving as expected after installing or reinstalling, be sure you clear cache at all layers, including:
- Plugins (if applicable)
- Themes (if applicable)
- Site/server cache at Kinsta (from either MyKinsta or the Kinsta MU plugin)
- Cache at StackPath
- Browser cache
IP Address Blocked by False Positive
If you have WAFand/or Firewall enabled at StackPath and you or a site visitor are being incorrectly blocked from viewing your site, this may be due to a false positive. If this happens, you’ll need to work with StackPath support and our Support team at Kinsta to track down where the block occurs.
If you’ve configured any custom rules in EdgeRules > Delivery Rules, you’ll need to check those as well and may need to provide a copy of all rules to our Support team when requesting assistance.
HTTP-HTTPS Redirect Loops
If you see any HTTP to HTTPS redirect loops on your site, check the following settings:
- In StackPath, make sure the Pull Protocol (Sites > Overview > Settings) is set to HTTPS Only.
- Make sure Force HTTPS is turned on in only one place, either in MyKinsta (Sites > sitename > Tools > Force HTTPS) or at StackPath (Sites > EdgeSSL > Force HTTPS Connections), but not both.
Advanced Settings and Compatibility
Host Header
Sites > Settings > Host Header: The host header must match the domain added to MyKinsta. The first domain added in StackPath is the default and is the host header used to pull content from your origin. If multiple domains are added to both MyKinsta and StackPath, change this to Dynamic.
Origin Authentication
Sites > Settings > Origin Authentication: If your Kinsta site is password-protected, configure StackPath to have access to the content.
Lifetime
Sites > CDN > Lifetime: The default is origin controlled, which means StackPath will respect the origin headers. The expiration is set to max on static files in Kinsta’s Cloudflare integration. If you want this configured differently, you can change this at StackPath.
Caching By Header
Sites > CDN > Caching By Header: This only needs to be enabled if you’re serving different content (completely different content, not just a different layout controlled by CSS or JavaScript) for mobile and desktop on the same URL. You may also need to contact our Support team to create custom Nginx rules to serve that content.
Delivery Rules
Sites > EdgeRules > Delivery Rules: If you have customized your WordPress login URL, you’ll need to create a custom Delivery Rule in EdgeRules to bypass the cache for that path. In the following example, our custom login URL is https://example.com/mylogin:
- If: URL Matches https://example.com/mylogin*
- Then: Bypass Cache
Custom robots.txt file
Sites > EdgeRules > Custom robots.txt file: If you enable this at StackPath, the robots.txt file served by Kinsta will be ignored, and you’ll need to manage your robots.txt file at StackPath. Any changes made to the robots.txt file at Kinsta will not affect the robots.txt file served by StackPath and will not be seen by search engines.
Referrer Protection
Sites > EdgeRules > Referrer Protection: If this is needed, enable with caution as it may block all traffic to your site. If your visitor’s referrer doesn’t match the domains listed in StackPath, they will receive a 403 Forbidden response and will be unable to see your site.